Users are the heart of Let’s Talk, providing members of the community with information and service. While your roll-out plan will help to decide which team members are brought on as Users at each phase, you’ll decide which permissions and Topics are appropriate for each of your colleagues, based on their roles in the district.
Adding Users
Adding Users to support your Topics can be completed either one-by-one or by uploading a spreadsheet of many district team members at once.
Add a User Individually
- Click the Add User button.
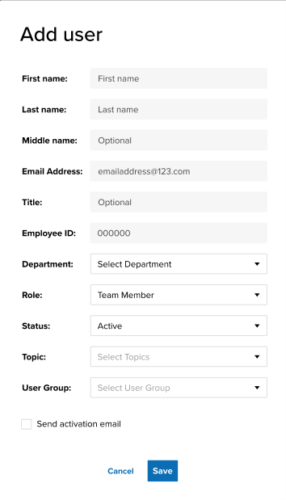
- Fill out the Add User form with the necessary information.
- The Employee ID field supports user management and is designed to work with our User Provisioning API.
- You may assign the User to a Topic by selecting the relevant check box(es). Select the key icon in front of the check box to further identify the User as the owner of the Topic. You may also assign the User to a User Group.
- The activation email and password can be sent to the user in this step. If you prefer, uncheck the box to send the activation email later. Please note: If you leave this box checked, the user will receive an activation email and have access to his or her Let’s Talk account.
- Remember to hit save at the top right-hand corner to save your changes!
Importing Users
- Click the Import User button to import new users.
- A sample template is available for download in Step 1 of the Import User Wizard.
- User lists need to be in a .xls or .xlsx file format.
- Following the Sample User Template, separate each user’s name, email, title, role, User Group, Topic, and Topic ownership by column. Multiple Topic ownerships listed for a single user should be separated by a semicolon (;) within the same column.
- Browse for your list on your computer, select the file, and click next.
- In step 3 of the Import User wizard, you’ll see your Import User Summary, which will let you know how many Users were uploaded, and if there are any duplicates, or Users with blank values in their entries.
- If you’re happy with your Import User Summary, click Upload to upload the User list to Let’s Talk.
- Remember to hit save at the top right-hand corner to save your changes!
- Note: users uploaded in bulk are not sent activation emails.
Send Activation Emails
When adding a User to Let’s Talk, a System Administrator can control when that User receives his or her username and password. Therefore, System Administrators can control when new Users can access their Let’s Talk accounts.
To send an activation email immediately upon adding a user, a System Administrator may fill out the User’s information and leave the box next to “Send Activation email and password to user” checked.
Under Settings > Users, any User who has not received an activation email is noted with a gray check icon under the Status column. Next to the icon, a link allowing the System Administrator to send the Activation email individually is available.
To send a User or multiple Users an activation email with a username and password, follow these steps:
- Navigate to Settings.
- Click Users under Account Setup on the left-hand menu.
- Select one or more Users by clicking the checkbox next to the appropriate name(s).
- Click the Send Activation Email button to send the User(s) login information.
- Click the Save button in the top right-hand corner.
Edit User Information
- Select the User or group of Users you would like to edit.
- Click the Edit button, make any necessary changes within the Edit User Information window, and click Save Changes.
- Remember to hit save at the top right-hand corner to save your changes!
If an email address is edited, an email will be sent to both the former and updated email addresses informing the user that his or her email address has been changed. The User will be required to log into Let’s Talk and create a new password.
Permission Levels
Let’s Talk has been designed to maximize collaboration across teams typically found within a school system. User permissions allow security and data protection but also encourage appropriate team workflow. See the tables below for information on the various User permissions found within Let’s Talk.
User Levels & Permissions
| Role | Function | Specifics | Permission |
|---|---|---|---|
| System Administrator | Control settings | Full access to Settings to customize account, including Topics, (with the exception of Private Topics) Users, and Dialogues | View all Dialogues, reports |
| Global User | Overview of account | Limited access to Settings | View all Dialogues, reports |
| Category Owner | Overview of Topic Level Category | Limited access to Settings, Full access to Users, Dialogues and Topics under the owned Category, (including Private Topics). | View all Dialogues and reports under the Category |
| Team Owner | Point person for content area | One per team Receives alert for new Dialogue and determines action Limited access to Settings | View only team Dialogues, reports |
| Team Member | Content area expert | Available to help respond to Dialogues, as determined by team owner | View only team Dialogues, reports |
| Recorder | Enter new content | Not responsible for follow-up Limited access to Settings | Views only Dialogues he/she has entered |
User Groups
To make groups of Users searchable, you may choose to enable User Groups. These groups can be found when a Customer uses the search bar on a landing page. Entering the name of a group (e.g. Special Education Department) will display the list of Users belonging to that group.
Add User Group
- Navigate to Settings, then click on Users under Account Setup on the left-hand menu.
- Click the blue Add button at the top of the page and select New User Group
- Click in the gray bar that says Enter User Group, then choose + Add User Group from the drop-down menu.
- Name your User Group (Smith High School, Special Education Department, etc.) by typing the name in the Enter User Group bar.
- Choose the Users to be added to this group by checking the boxes in front of their names. Find the relevant names by reviewing the box or by using the Search feature.
- Click on the Save Changes button to confirm your new group.
- Click the Save button in the top right-hand corner of the User Settings screen.
Edit User Group
- Navigate to Settings, then click on Users under Account Setup on the left-hand menu.
- Click the blue Add button at the top of the page and select New User Group
- Click in the gray bar that says Enter User Group, then choose the appropriate User Group from the drop-down menu.
- Hover over the name of your selected User Group, then click on the pencil icon that appears to the right. Make the appropriate changes.
- Click on the Save Changes button to confirm your updated settings.
- Click the Save button in the top right-hand corner of the User Settings screen.
Delete User Group
- Navigate to Settings, then click on Users under Account Setup on the left-hand menu.
- Click the blue Add button at the top of the page and select New User Group
- Click in the gray bar that says Enter User Group, then choose the appropriate User Group from the drop-down menu.
- Hover over the name of your selected User Group, then click on the pencil icon that appears to the right. Remove all of your Users from this Group.
- Click on the Save Changes button to confirm your updates.
- Return to the same menu, clicking the blue User Group button.
- In the gray Enter User User Group bar, choose the appropriate User Group.
- Hover over the name of your selected User Group, then click on the X icon that appears to the right. Note: You will need to delete Users from your Group before you are able to delete the Group.
- Click OK to confirm that you want to delete this User Group.
- Click on the Save Changes button to confirm your new group.
- Click the Save button in the top right-hand corner of the User Settings screen.
Notes on User Groups:
- A User must belong to an Topic (member or owner) be added to a user group.
- When a Dialogue is sent directly to a User, it will be assigned to the first Topic the User owns, as listed in Settings.
- If the User does not own a Topic, the Dialogue will be assigned to the first Topic of which the User is a team member, as listed in Settings.
Filter Options
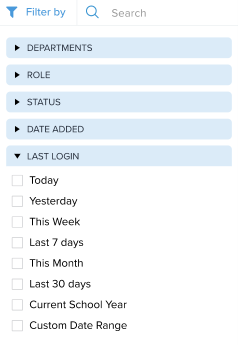
Filter by any of the following:
- Department
- Role
- User Status
- Date Added
- Last Login Date
For districts using our User Provisioning API, quick filters appear at the top right of the Users page, making it easy to see new users who have been recently added or had their department modified. Simply click on one of the items to view a filtered list.
![]()