Landing Page Dashboard
This section allows System Administrators to create and manage the appearance of Let’s Talk access points: Landing Pages, Tabs, and FABs. Customized landing pages may be created for an entire district, a specific region or school, or even an event or topic. Each landing page can have its own customized welcome message, topics, colors, and more.
Create a Landing Page
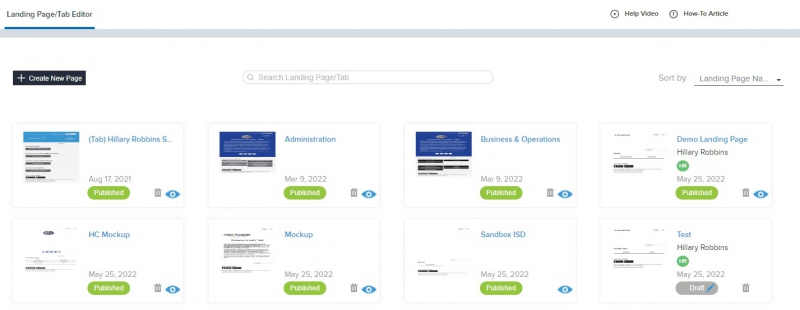
Under Settings, click on Landing Page/Tab Editor:
- Click the black “Create New Page” button
- Add a name and zip code for your landing page (this can be changed later) and click Continue.
- A Landing Page Wizard will guide you through, which you can choose to skip
- Under Content, add at least one Topic to the new landing page.
- Once you add a Topic to your landing page, it will also add it to your Tab.
- Click the Save button in the top right-hand corner of the page.
The new landing page and tab can be found in a comprehensive dashboard under the Landing Page Dashboard.
Edit a Landing Page
Under Settings, click on Landing Page/Tab Editor and select the Landing Page you’d like to edit:
- Click on the pencil icon in the upper right corner to edit the Landing Page title.
- Click on Content to add, edit, or remove Categories and Topics from your landing page.
- Choose between a Standard or Advanced Page Layout.
- Toggle to Design to customize the following:
- Choose between a Full Page, Tab, or FAB.
- Page Properties: Customize the width of the landing page.
- Color Theme: Customize the colors of your landing page with a color picker or hex codes.
- Display Preferences: allows you to enable advanced settings on the landing page.
- Allow Collapsible Categories: Adjusts each category section to have a dropdown and choose if all will be expanded or collapsed.
- Search Functionality: Adds a search bar onto the Landing Page. You can customize searchable Topics in Search Options.
- High Contrast Version: Adjusts the colors to a higher contrast to increase readability.
- Let’s Talk ID (mobile app): Each landing page comes with a Let’s Talk ID, which allows your customers to find the landing page within the mobile Let’s Talk app for customers.
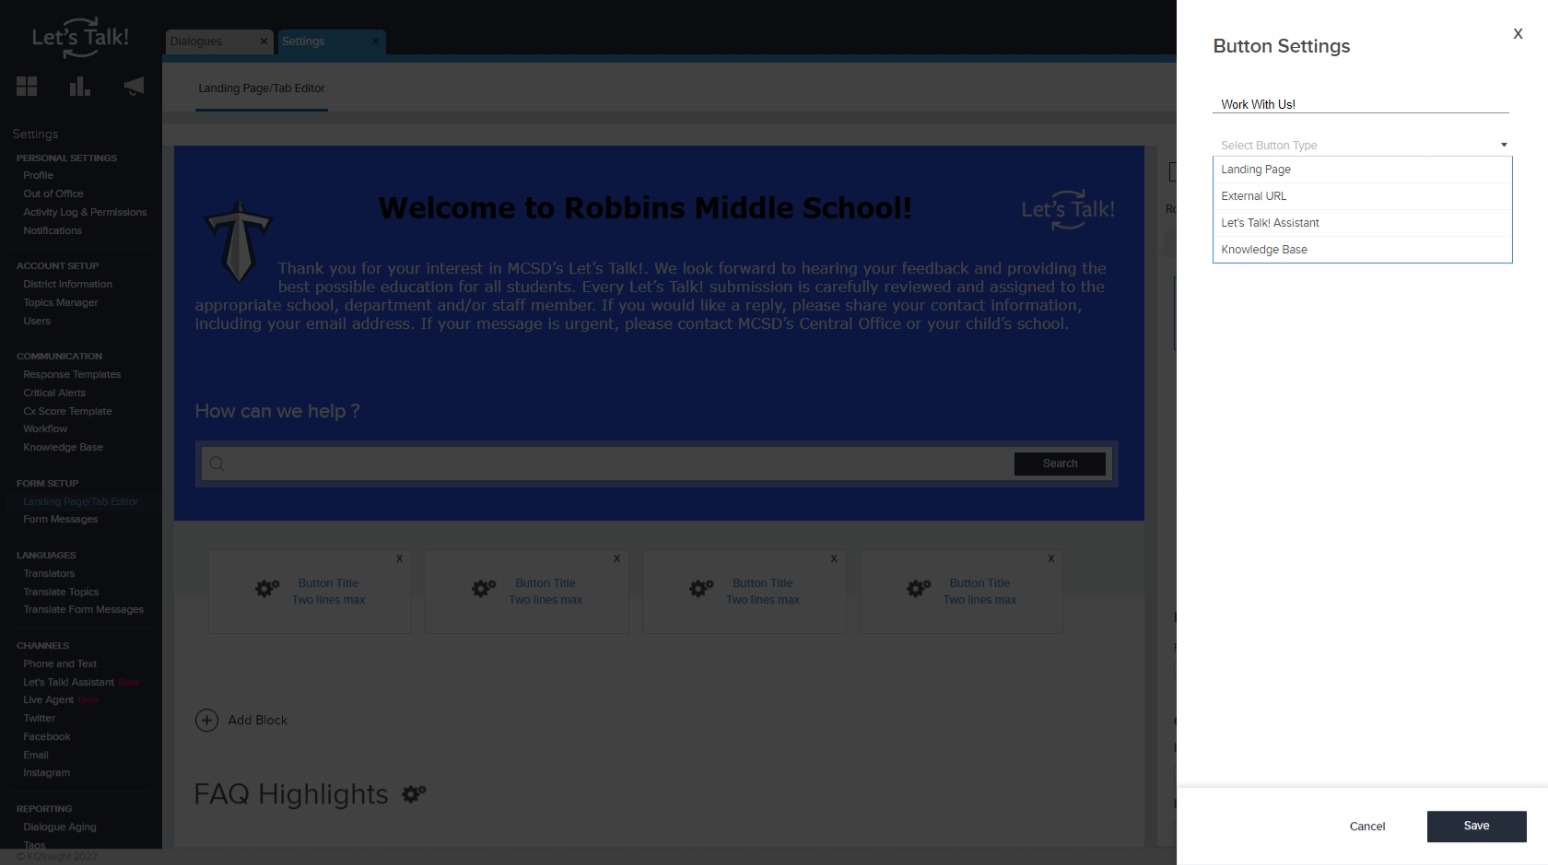
- When using Advanced settings, you have the option to highlight up to four custom buttons along the top of your landing page. You can choose from an additional landing page, an external URL, linking your Let’s Talk Assistant, or your Knowledge Base.
- Under FAQ Highlights, you can select up to 6 frequently asked questions from your Knowledge Base to highlight.
- Remember to click the Save button in the top right-hand corner of the page when you are done!
Note: This section displays an approximate preview of the landing page. The most accurate display will be found on a live page or through a link you download.
Edit a Tab or FAB
The Let’s Talk Tab and FAB are easy to implement and give your customers easy access throughout your district or school website. They can be positioned on the side or bottom of your webpage, allowing the Customer to fill out a simple Let’s Talk form and you to quickly gather feedback. By just copying and pasting a block of code once, Let’s Talk access can be easily implemented on all pages of your website.
Under Settings, click on Landing Page/Tab Editor:
- Previously created Landing Pages will each have their own tile that you can find in the dashboard.
- Toggle to Tab or FAB to edit Desktop and Mobile view, Page Editor settings, and Share.
- Add and remove Topics.
- Review the menu of color options and select what works best.
- Tab Color: Consider selecting a color with sufficient contrast to ensure readability and usability for everyone.
- Choose your preferred icon by selecting a logo or clicking none.
- Under Welcome Text, add the message you would like customers to see at the top of the opened Tab. This message appears above the Topic dropdown menu.
- Remember to hit save at the top right-hand corner to save your changes!
Mobile Website Tabs – For tabs that appear to your visitors when viewing your district website from a phone.
 Under Settings, click on Landing Page/Tab Editor:
- Select the tab that you want to edit from the dashboard.
- Under Page Editor, Click on Mobile View to expand the editor.
- You’ll see the preview of the mobile floating icon on the left
- Choose the color theme of the icon from multiple color selections
- Select the tab icon and size you want to be displayed as the floating icon
Share or Download a Landing Page, Tab, and FAB
Under Settings, click on Landing Page/Tab Editor:
- Select the landing page, tab, or FAB you want to share or download
- Before sharing, you can preview before publishing.
- When ready to publish, you have three choices:
- Email – Send the embed code to an email with an optional message. Also, send codes and links for custom Topics by checking Custom Topic form embed codes.
- Embed – Directly copy the embed code
- Download – Download an Excel with the embed codes and associated URLs. Also allows the download of codes and links for custom Topics by checking Custom Topic form embed codes.
- You can always unpublish a landing page at any time by clicking the unpublish button.
Delete a Landing Page
Under Settings, click on Landing Page/Tab Editor:
- Select the landing page or tab to be deleted from the dashboard by clicking on the trashcan icon.
- A pop-up message will confirm by asking if you are sure you want to delete this landing page/tab.
- Click on Delete and a notification will let you know that it has been successfully deleted.
Add Search to a Landing Page
Under Settings, click on Landing Page/Tab Editor:
- From the dashboard menu, select the landing page on which search options will be enabled.
- Click on Design and scroll to Display Preferences.
- Toggle Search Functionality from OFF to ON to enable the search box option.
- Click the Save button in the top right-hand corner of the page.
- The search field will now display on your landing page.
Customize Search Options
Under Settings, click on Landing Page/Tab Editor:
- From the dashboard menu, select the landing page on which search options will be enabled.
- Click Page Editor and scroll to Display Preferences.
- Click Search Options to customize your search settings.
Search bar title:
- Enter a custom default title to display in the search field, providing additional instructions to your customers. For example, by entering “Search Schools”, you are informing customers that they can search for district schools.
- The search field title should reflect the searchable options set in Search Options.
Topics:
- Define which Topics are searchable when a Customer uses the search bar on a landing page.
- Use the checkboxes to make a Topic searchable. When a Topic is checked, it will display as a matching result in the search results window.
User Group:
- Define which user groups are searchable when a Customer uses the search bar on a landing page
- Use the checkboxes to make a user group and its members searchable. When the user group is checked, it will display as a matching result in the search results window.
Notes on User Groups:
- A User must belong to a Topic (member or owner) and be added to a user group.
- When a Dialogue is sent directly to a User, it will be assigned to the first Topic the User owns, as listed in Settings.
- If the User does not own a Topic, the Dialogue will be assigned to the first Topic of which the user is a team member, as listed in Settings.
Click the green Save button in the top right-hand corner of the page.