Skip to content
site logo
  • Home
  • Articles
    • How-to Articles
    • Product Updates
    • District Examples
    • Getting Started
    • Best Practices
    • FAQs
  • Resources
  • Training
    • New User
    • Tips and Tricks
    • System Admin
  • Support
  • Home
  • Articles
    • How-to Articles
    • Product Updates
    • District Examples
    • Getting Started
    • Best Practices
    • FAQs
  • Resources
  • Training
    • New User
    • Tips and Tricks
    • System Admin
  • Support
Let’s Talk Login

Delete Inactive Let's Talk Users

  • Category: How-to Articles
  • Tags: Account Setup, User Management

More results...

Generic selectors
Exact matches only
Search in title
Search in content
Post Type Selectors
Articles

User accounts that have a status of "Inactive" or  "Unverified" can now be deleted within User Settings.

How to delete Unverified and Inactive Users

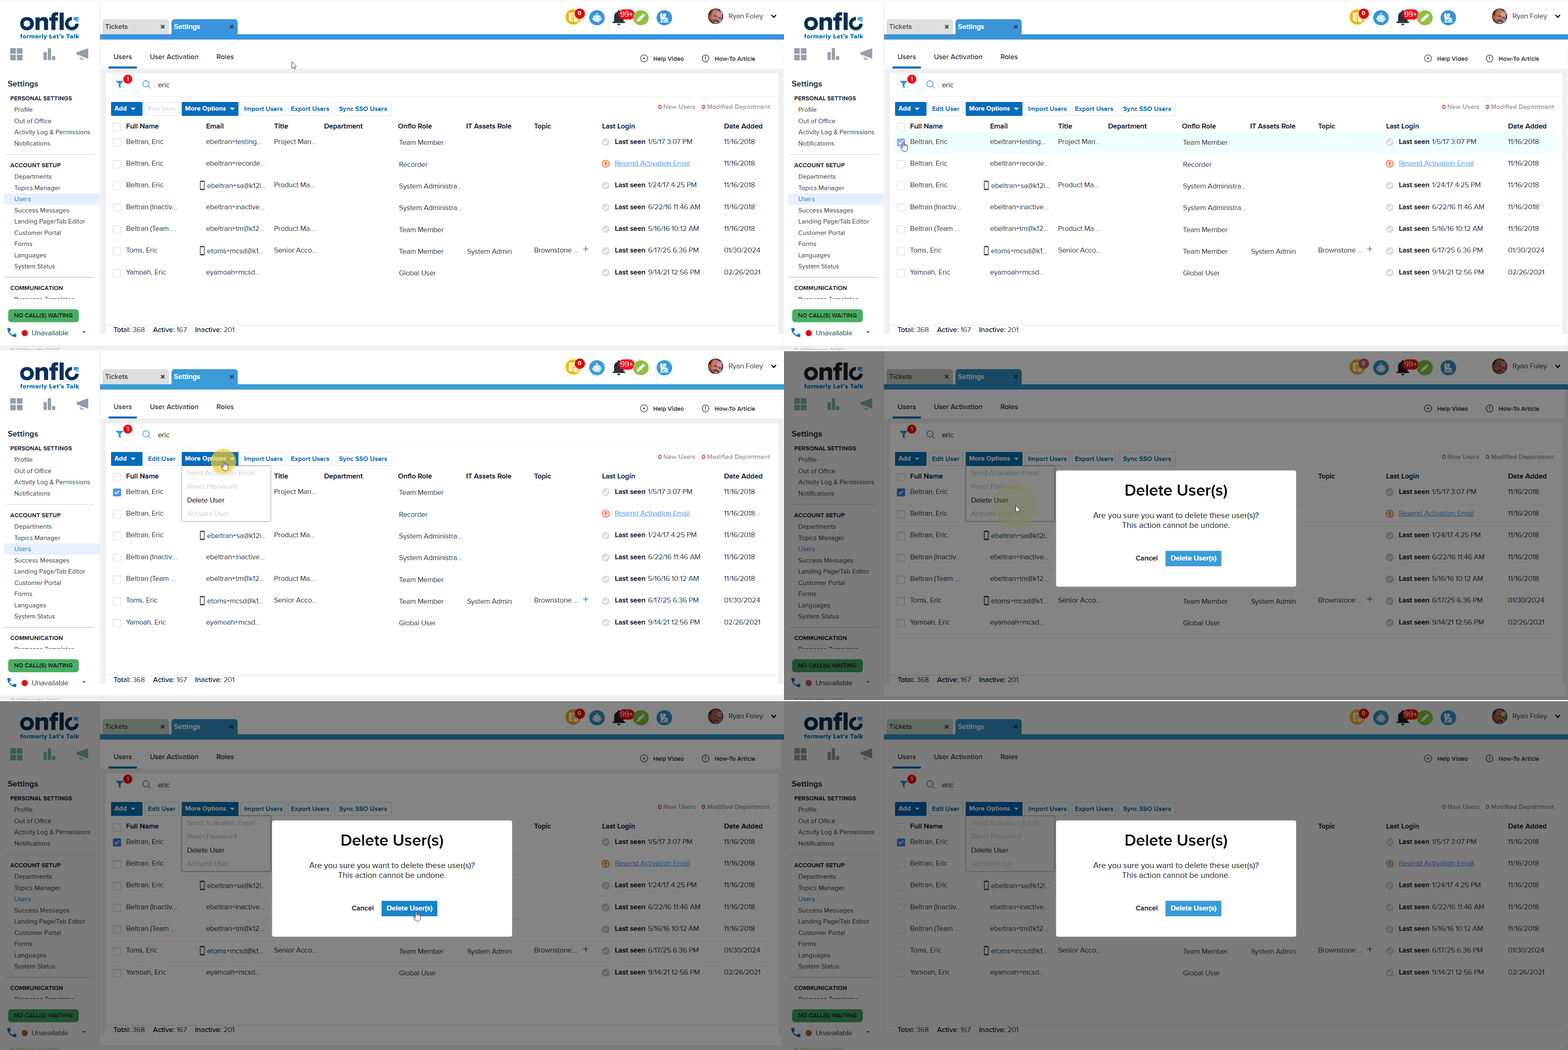
  • From the Settings page, select Users listed under Account Setup.
  • Click the Filter > Status > and select Unverified and/or Inactive.
  • Be sure to click "Apply Filters" at the bottom.
  • You will now see any user account that is Unverified and/or Inactive. Look at the "Last Login" column and you will see those that are Inactive will show a grey check, while those who are unverified will show a red exclamation mark.
  • Check the box next to the User's name then click the Delete User button up top. Please note, this button will be greyed out until you check the box next to a user's name. 
  • A pop-up box will appear to confirm you would like to delete the selected users. This action cannot be undone so please delete wisely.
Note: System Administrators can delete a user whether they own dialogues or not. The System Administrator who deletes the user account that owns dialogues, the dialogues will be reassigned to the System Administrator who deletes the account. 

PreviousAnswer-Based Workflows in Forms
NextSharing a Dialogue via Hyperlink

Related Post

How To Disclose Confidential Information

Overview Let’s Talk may be used to report issues of a more serious nature that need to be escalated to officials or handled by staff within or outside of your organization. When these situations arise, Let’s Talk can provide confidential

Read More ➜

How to Allow Microphone Access for Let’s Talk in Google Chrome

If you’re having trouble using your microphone with our application, follow these steps to ensure Chrome is set to allow microphone access: Step 1: Open Chrome Settings Click the three dots menu in the top-right corner of Chrome. Select Settings.

Read More ➜

Overview of Telephony and Call Center

Let’s Talk’s Telephony and Call Center features make it easy to manage and route calls, whether you’re a single agent or part of a larger support team. From basic phone handling and IVR menus to detailed dashboards and queue management

Read More ➜
site logo

Need support?

Our Client Services Team is here to help between 8:30 a.m. – 8 p.m. ET. Get support here or call us at (703) 542-9601.

Follow Us on

Youtube Linkedin

Get Let’s Talk on Mobile

apple store
g play

Quick links

  • Privacy
  • Security
  • Support
  • Training
  • Resources
  • Credits

Articles

  • How-to Articles
  • Product Updates
  • District Examples
  • Best Practices
  • Get Started
  • FAQs

Get Newsletter

Sign up to get Let’s Talk Tips & Tricks delivered directly to your inbox.
Scroll to top