Let’s Talk! Knowledge Base makes it easy for customers to find information, without having to ask your team for help.
Only System Administrators, Category Owners, and Team Owners can access the Knowledge Base feature by default, but other users can be given article access (more on that later!)
Creating New Articles
- Go to Settings, then select Knowledge Base under the Communications section in the left panel. This will bring you to the Article Manager view

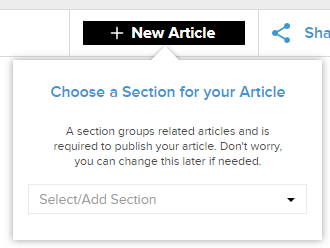
- Click the New Article button at the top of the page, then select the section you would like to file the article under. This will bring you to the Article Editor view
- If the desired section does not yet exist, simply type in the text box and click “Add new section” to create a new one. (sections can be edited later, if needed)

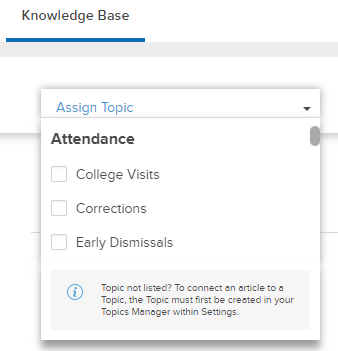
- Expand the Assign Topic drop-down menu, and select the corresponding Topic(s).
- Assigning Topic(s) to articles is optional, but highly recommended. Doing so will link them, and allow customers to be brought to the dialogue form (via the contact button) if their question was not effectively answered by the information in the article.
Adding Article Content
- Add a descriptive title for your article in the Article Title field
- Click Add Block to reveal a menu for adding text, headings, images, and videos
- Text content can be customized with a range of formatting options
- Headings help to guide the reader through your article. Use a combination of H1 and H2 to organize information.
- Images can be uploaded from your computer and edited upon double-click. Permitted file types include: .jpeg, .jpg, .tif, .png, .gif, .bmp, .tiff
- Videos can be uploaded via file, URL, or embed code. Permitted file types include: .wma, .wv, .mkv, .flv, .avi, .wmv, .mp4, .mpg, .3gp
- Copy/Delete a block at any time by hovering over the vertical ellipsis button of the corresponding block on the far right side of the screen.
- Move a block by hovering over the vertical ellipsis button of the corresponding block on the far right side of the screen and dragging the block to your preferred position.
Assigning Article Managers, Tags, and FAQs
Options for assigning Article Managers, adding Tags, and linking FAQs can be found at the bottom right of the Article Editor Page

- Click Assign Article Manager and select the desired users. Article Managers have editing access to articles and are responsible for keeping content up-to-date. Each article can have an unlimited number of article managers
- Next, choose Tags for the article. These Tags will automatically get applied to dialogues submitted from the article page.
- The LT! Assistant! FAQ button will reveal the full list of FAQs active in the account. When the chatbot provides an answer to the selected question(s), it will also include a link to the current article.
Article Visibility and Sharing

Public: Article is posted/embedded on your website, and any customer can view it
Internal Users: Article can be used as a reference document by Let’s Talk! users
Click the Share button at the bottom right of the Article Editor view to share an article via URL, email, or embed code
Note: You can embed or share sections of articles or the entire knowledge base from the Article Manager view
Once complete, you have the option to preview, publish or save your article as a draft at the top right of the page.
Editing Existing Articles
- Go to Settings, then select Knowledge Base under the Communications section in the left panel.
- Click on an article to launch the Article Editor view
- Edit the content of any block by clicking into it
- When finished, click on Preview, Publish, or Save Draft in the top right corner
