Onflo (formerly Let's Talk!) telephony features empower your district to use our platform for calling and texting, helping you efficiently manage incoming and outgoing calls, agent queues, and more. This article will explain the differences between Onflo two telephony services, Basic Telephony and Call Center, and will also provide information on Basic Telephony setup and routing, including Phone Numbers, Queues, Greetings, and Texting.
Basic Telephony vs. Call Center
The Basic Telephony feature allows you to:
- Organize phone management by handling inbound and outbound phone calls
- Use text-to-ticket to send and receive text messages through the Onflo ticket interface
- Customize customer experiences by creating and assigning separate queues to different phone lines, with unique agents, greetings, and ticket assignments.
- Answer calls without new hardware by using with Voice over Internet Protocol (VoIP), meaning anyone with a computer and mic can start answering calls right away.
Add up to 10 phone numbers with the ability to add additional phone numbers for an extra fee
The Call Center feature includes all of the Basic Telephony functionality, plus the following:
- Round-robin phone agent queues, which ensure customers get to a human quickly and no one person is overloaded with calls.
- Interactive Voice Response (IVR) routing, which allows customers to interact with a multi-layered menu using the keypad on their phone to find the right department (click Onflo Call Center Features: Advanced Routing Settings for additional information on setup and use).
- Advanced Call Center management features that allow team leaders to easily manage queues, change phone agent statuses, and listen to or join an existing call with call monitoring features.
- Detailed reporting to help you understand call center operations, including customer experience (CSAT and wait times), agent performance, and call volume.
- Agent Status Report, which gives insight into patterns in agent call availability and call durations.
- Business Hour rules indicate which phone queues are open and available to take calls during specific days and times of the week (click Onflo Call Center Features: Advanced Routing Settings for additional information on setup and use).
Basic Call Routing vs. Round Robin
With Basic Telephony, incoming calls, once directed to a queue, are displayed to all of the queue’s agents at once. If a call is not picked up within 20 seconds, or all agents decline the call, it is immediately sent to voicemail (if enabled).
With Call Center, we use a more advanced routing technique called “Round Robin”. Each call is placed in a “call queue” and each agent in an “agent queue”. Then calls that are at the top of the call queue are presented to agents at the top of the agent queue. Once agents are done handling a call, they are placed at the bottom of the agent queue. If all agents are engaged in other calls, then calls wait in the call queue until an agent is available. All this helps ensure that as many calls are handled as possible, and there is an even distribution of calls handled by each agent.Call center also allows for more flexibility in routing, such as designating high priority calls and changing the order of the call and agent queue. These are covered in articles such as Onflo Call Center Features: Advanced Routing Settings and Queue Management: Streamlining Call Center Operations.
Basic Telephony Setup and Routing
- Phone Number Settings
- Queue Settings
- Greeting Settings
- Texting Settings
Phone Number Settings
With Onflo, users can easily request and manage multiple phone numbers via the Numbers settings page. Here's how to get started:
Request/Create Number
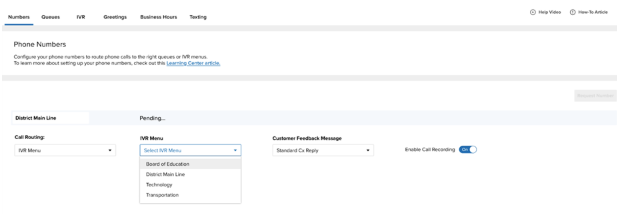
Click on "Request Number" to add your first number. Choose a name for the phone number, which will be displayed throughout the application.
Call Routing
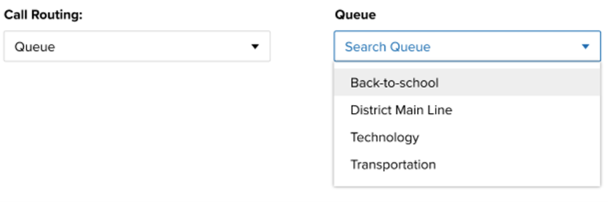
Decide how the phone number will route:
- Queue: Choose which queue to route calls to.
- Greeting: Determine which recording to play.
- Note: This is not a voicemail box, but just a recorded greeting for your customers to hear. To set up a voicemail box, you can route calls to a queue that does not have any agents assigned to it.
Call Recording Announcement
When transferring a call or making an outbound call, an announcement alerts the recipient that the call is being recorded (if applicable).
Customer Feedback Message
Select a Cx Text Message from your list of Saved Replies for gathering feedback for calls, texts, inbound, and outbound calls from this number.
Call Recording
Choose whether calls are recorded for that number or not, affecting both inbound and outbound calls.
Available to Outgoing Calls
Decide if this number is eligible for outbound calls. Please note that live outgoing calls can be seen in the Call Center Dashboard under the Live Calls section.
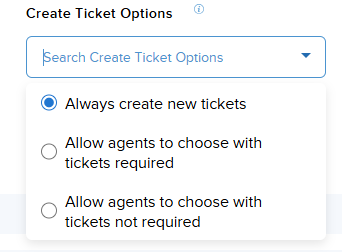
Create Ticket Options
You can select an option agents associate phone calls with tickets by enabling one of the following selections from the drop-down menu:
- Always create new tickets. Tickets will be generated automatically at the beginning of a call.
- Allow agents to choose with tickets required.
- Allow agents to choose with tickets not required
Queue Settings
A queue is a location where you can route phone calls to ensure that calls are assigned to the right topic and agents and also that callers have the right experience (with the right greetings). You can now configure queues separately from phone numbers to allow for more advanced call routing capabilities. Here’s how to streamline your queue topics, assign agents, and customize other settings:
Create a Queue
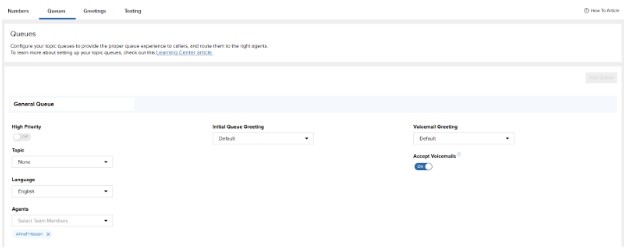
Click on "Add Queue" to create your first topic queue. Enter a name for the queue, which will be displayed across the application.
Queue Topic and Agents
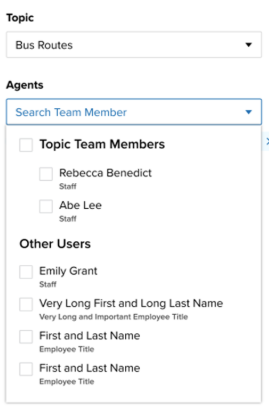
Assign a topic to calls in the queue. Select agents who will handle those calls, including both topic team members and additional agents from outside the team.
Initial Queue Greeting
This is the greeting that plays when a caller first enters the queue.
Call Priority
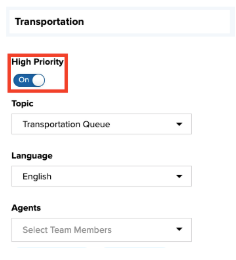
Toggle on the High Priority option within queue settings to have these calls answered before queues that do not have this option turned on.
Tips
- If agents are assigned multiple queues, they will be presented with calls from queues labeled as High Priority first.
- Calls in the queue management page will be ordered based on priority.
Voicemail Settings
Queues also function as voicemail boxes. When no agents are working, callers will hear a greeting message that can be customized in the queue settings. Then, if voicemails are accepted by the queue, they will be allowed to leave a voicemail message. That will log a ticket that agents can follow up on once they’re available.
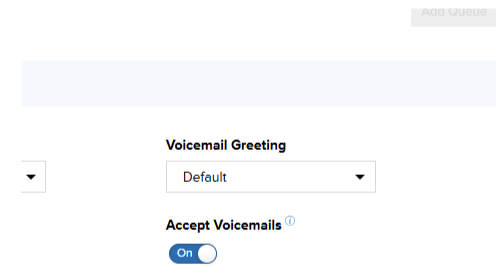
Greeting Settings
Enhance caller experience with personalized greeting messages, which allows users to create common greetings to use across multiple queues and other areas, reducing redundancy and making them easier to manage.
Creating Greetings

Click on "Add Greeting" to upload audio files for greetings. Each greeting requires a name and accepts mp3 and wav files.
Update Greetings
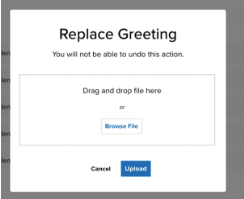
Click the Replace button to easily re-upload audio files to update greetings or change their names.
Text-to-Speech
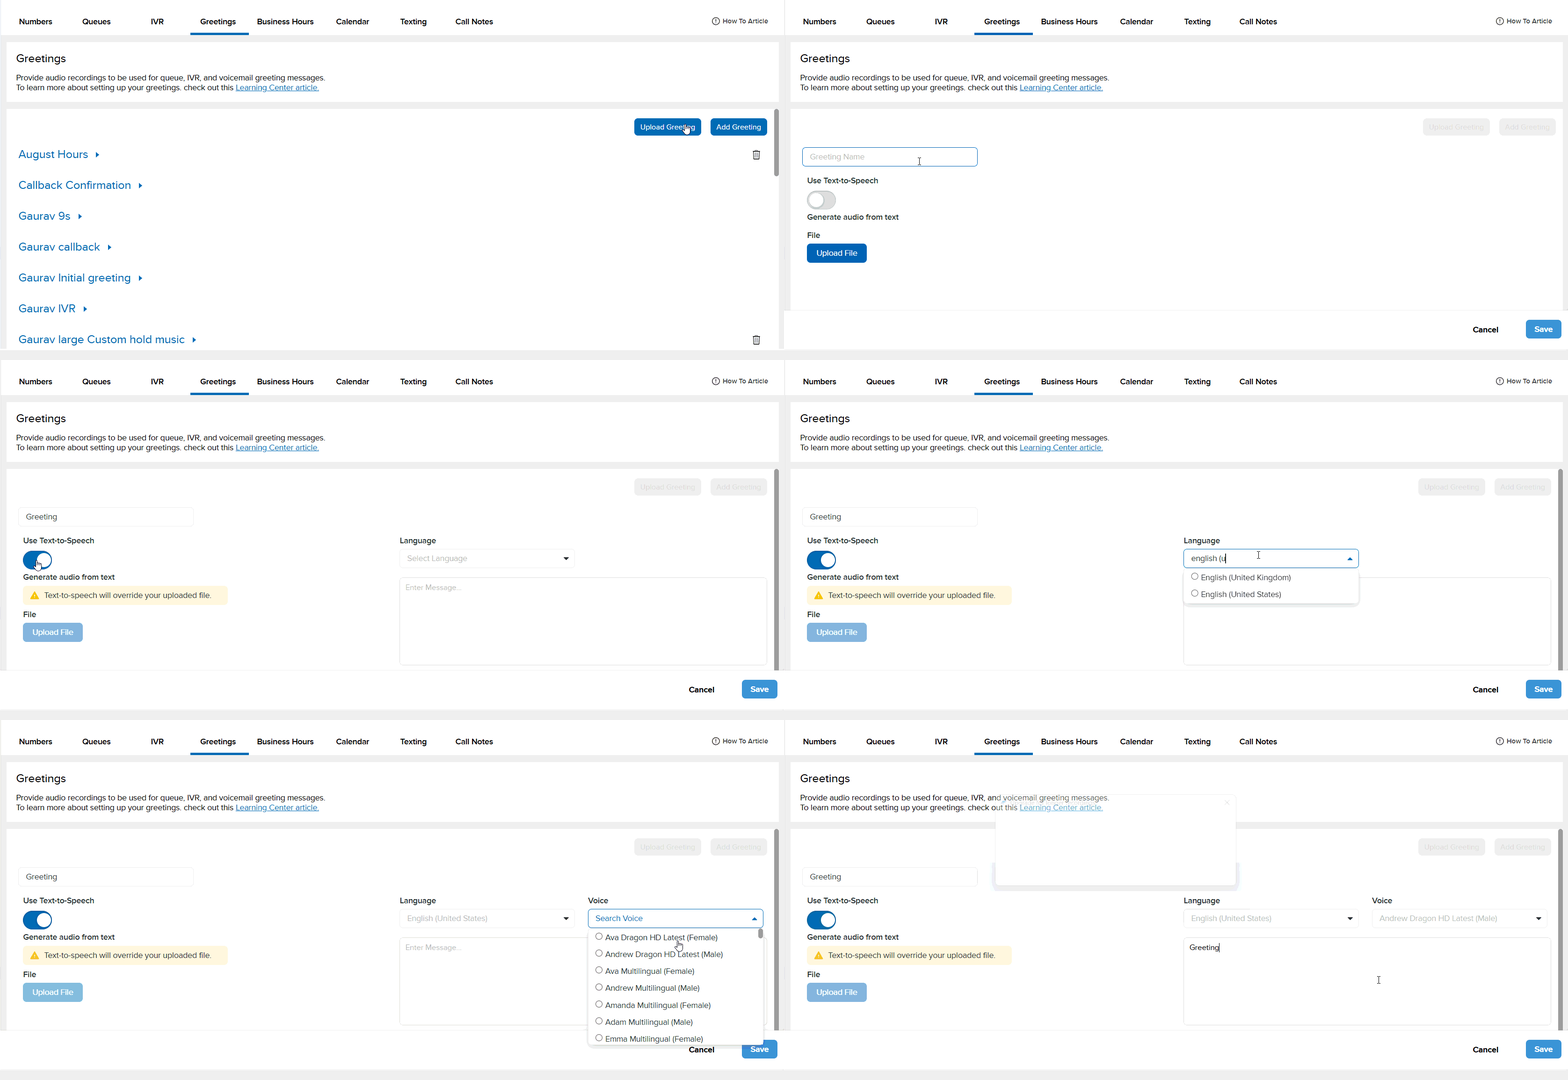
This tool provides users with an quick and efficient method for creating greetings without requiring the use of recording tools. Utilizing this tool will provide you with the ability to create greetings through Add Greeting, or replace a greeting within an existing greeting.
Add Greeting
- Click the Add Greeting button
- Click the toggle Text-to-Speech toggle
- Select the language from the drop-down menu
- Select the voice of the user you would like to have the recording read in
- Enter the message you wish to have in your greeting
Replace Greeting
Within an existing greeting, you can also use this feature to replace greetings you have previously uploaded. To access this feature you can click on the greeting, and follow the steps outlined above.
Note: Using this feature will override any greetings you may have previously recorded.
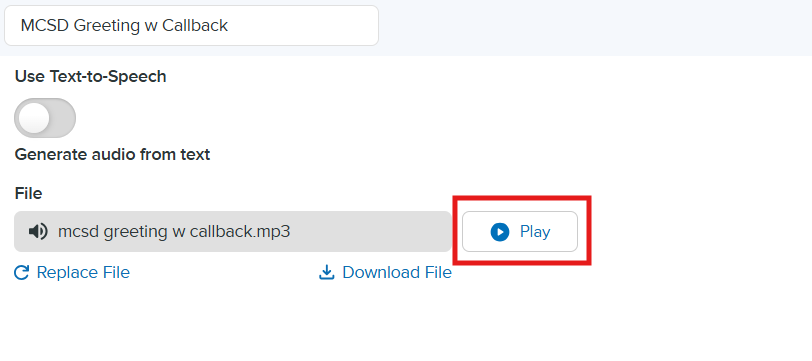
Preview Greeting
To ensure that audio greetings are accurate and contain all necessary information you can preview the greeting. To preview the greeting click the Play button and you will be able to listen to the greeting.
Texting Settings
Configure text settings and manage your library of saved replies.
Phone Number Text Settings

Manage text settings for each phone number associated with your account. Select a Topic, Auto-Reply Message, and Cx Score Text Message, and identify your Text Message Team.
Associating Text Tickets with Topics
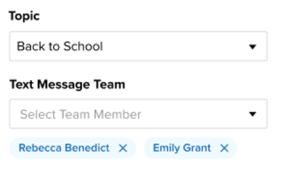
Assign a topic to text tickets for efficient organization.
Auto-Reply

Choose an Auto-Reply message from your Saved Replies list or select "None."
Saved Replies
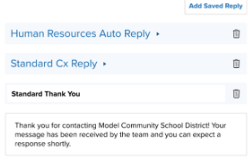
Create and manage saved replies for tickets, Cx Messages, or Auto-Reply Messages. Add a Saved Reply by selecting “Add Saved Reply.” Edit the name and message for each Saved Reply.
Lifecycle of a Text Ticket
- A customer sends a text message to the Onflo Number and immediately receives the auto-reply (unless disabled in settings).
- Their message will then land in the inbox of the selected texting team with no topic assigned.
- A member of the texting team will review the ticket and assign it to the proper topic.
- Proceed as with any Onflo Ticket.
- If you know additional contact information about the customer who texted in, you can update it under Customer Information within the ticket.
- Replies will be sent back as a text message reply. The option to send an email response will be available if the customer’s email address is added to Customer Information.
- When the ticket is closed, the customer will receive a feedback form sent as a link through their text messages.
With these comprehensive telephony settings, you can optimize your communication workflow and deliver exceptional experiences to your stakeholders with phone lines and texting. If you have any further questions or need assistance, don't hesitate to reach out to our support team via the "Need Help" button on the left side of the page.