Make Let’s Talk! work for you like never before. System Administrators can create automatic workflows that will help build efficiency, improve performance outcomes, and enhance data.
A workflow is a set of actions that are executed when specified conditions are met. Use workflows to automate processes like escalating past due dialogues to a supervisor, simplifying attendance reporting, or following up on low Cx scores.
How to Create a new Workflow

Workflow Manager
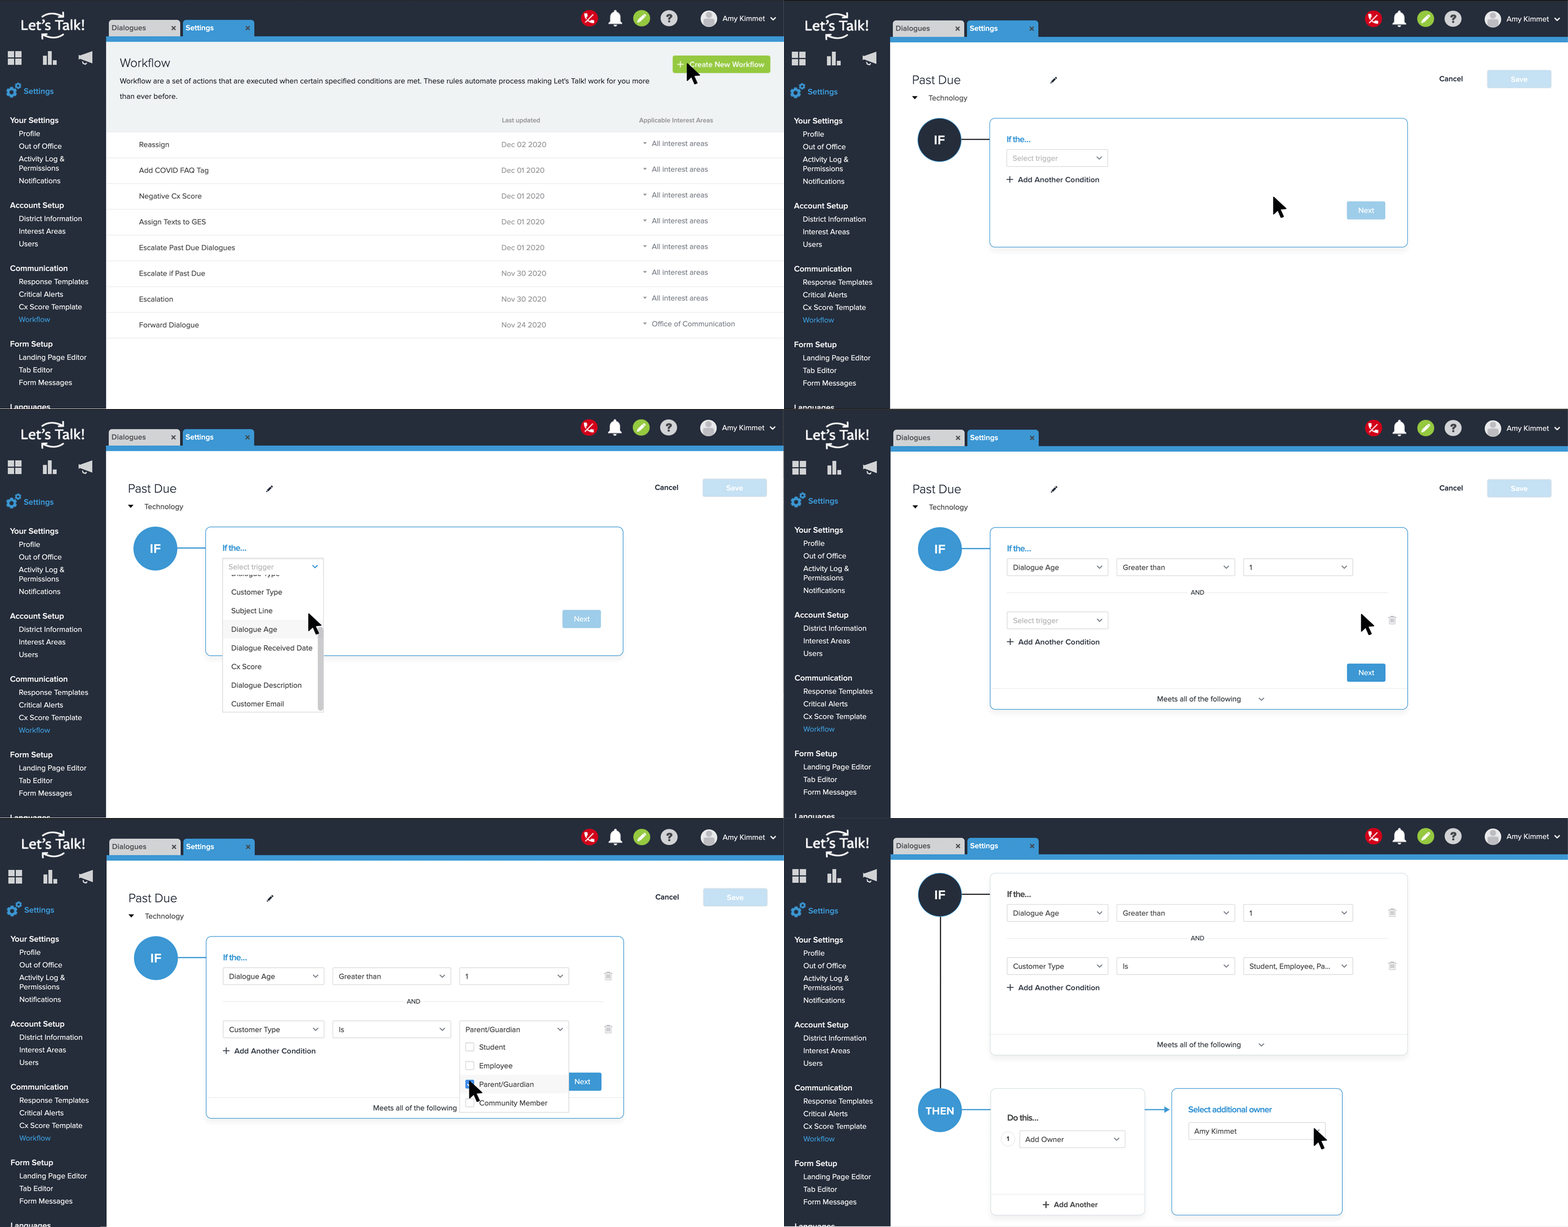
- Go to Settings, and select “Workflow” under the Communication section in the left panel.
- This will bring you to the Workflow Manager where you can view/edit all of your existing workflows.
- To create a new workflow, click on the “Create New Workflow” button located in the top right.
- To get started, name your workflow and select which Topic(s) it should apply to. For example, a workflow can be titled “Escalate Past Due Dialogues” and applied to all Topics.
- Click “Begin” to start configuring your trigger conditions.
Trigger Conditions (If)
Workflows are configured using “If” & “Then” components, where “If” is the trigger and “Then” is the action that follows.
- To define the “If” component, click on the “Select trigger” drop-down menu and pick the variable that you want to be used to trigger your workflow.
Triggers include: Status, Priority, Dialogue Entry Point, Dialogue Type, Customer Type, Subject Line, Dialogue Age, Dialogue Received Date, Cx Score, Dialogue Description, Customer Email, and Language
-
- Based on this first selection, more drop-down menus will appear to specify the trigger condition.
- In our example, to define the “If” component for our “Escalate Past Due Dialogues” workflow, we can select “Dialogue Age” as the trigger then select “greater than” and “3”. Based on these settings, the trigger condition is now applied to Dialogues with ages greater than 3 days.
-
- If necessary, click on “+ Add Another Condition” button to specify other conditions where you would like your workflow to function.
- In our example, we can set “priority” as the second trigger, and specify it for dialogues rated as P1 (Urgent).
- Choose the interaction criteria between multiple triggers as either “Meets all of the following” or “Meets any of the following” depending on your need.
- Once trigger conditions are set, click the “Next” button to configure action items.
Action Items (Then)
Action items are the actions that will happen once trigger conditions are met. In this example, the “IF” is a dialogue that is past due, and the “THEN” is escalating the dialogue.
-
- In order to define the “Then” component, select an action from the “Choose action” drop-down menu.
- For our example, we selected “Add Owner” then picked the User in the subsequent field.
-
- Similar to trigger conditions, you can add more action items by clicking “+ Add Another”.
- For our example, we can choose “Add Internal Comment” as an additional action item then specify the text for the internal comment.
- Once finished with both “If” and “Then” components, click “Save” in the top right corner to save your workflow.
Edit an Existing Workflow
Within the Workflow Manager, you can manage all existing workflows.
- Click on any Workflow to edit the trigger conditions and/or action items.
- Select multiple workflows to edit by hovering over each item and clicking the check box on the left side. Once selected, you have the options to:
- Delete the workflows
- Duplicate the workflows
- To turn off a Workflow, simply hover over it and toggle the corresponding ON/OFF switch located on the right-hand side.
Helpful Tips
When executing workflows, there are a few tips to know with existing dialogues or newly created dialogues. Please refer to the table below when choosing the triggering action on a workflow.
Ex:
- If the trigger selected is dialogue age, then this would only apply to existing workflows.
- If the trigger selected is priority, then this would only apply to newly created workflows.
