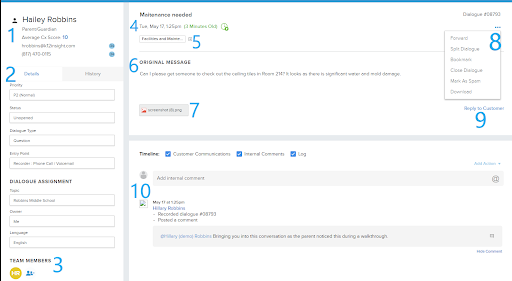
Let's drill down on one specific Dialogue. Open a Dialogue by clicking on it from the Inbox view.

- Customer Information
- Dialogue Details
- Team Members
- Date Received and Dialogue Age
- Tags
- Original Message
- Attachments
- Bookmark and Forward Dialogue
- Action Buttons
- Timeline
Fields
The following table describes the various fields and sections found on the Dialogue Details page.
| Name | Customer name |
|---|---|
| Type | Customer type (parent, student, staff, or community member) |
| Phone | Customer phone number |
| Customer email | |
| Priority | Critical, P1 (Urgent), P2 (Normal), P3 (Low) |
| Status | Unopened: The Dialogue has not been opened or action has not been taken yet by any user. In Progress: Action has been taken by a user. Pending Details: Stops the Dialogue from aging. To be used when the user is awaiting action or information from the customer. Closed: No further action is needed. The Dialogue is considered closed. |
| Type | Question, Comment, Concern, Suggestion, and Compliment |
| Entry Point | The source of the Dialogue (District website, Facebook, Twitter, Recorder, etc.) |
| Topic | The assigned area denoted by the customer or user. |
| Owner | The user responsible for the action necessary to Close the Dialogue. |
| Team Members | Team Member of the assigned Topic are attached to the Dialogue as part of the team. Ownership of the Dialogue can be assigned to anyone who is currently on the team. Other users can be brought onto the team by clicking on the plus button. |
| Tags | Tags can be added to any Dialogue for further categorization. A default set of tags and tag categories are provided. Custom tags can be added in Settings by the System Administrator. |
| Attachments | Any attachments received from the customer or sent by the user are consolidated here for ease of access. |
Timeline
The Timeline is a record of all activity that occurs with a particular Dialogue. Time, date, and responsible User are included in each entry. Changes to the Status, addition of Team Members, Customer replies, internal comments, and more are recorded here to serve as historical data. Use the checkboxes to filter the display (Customer Communications, Internal Comments, and Log).
- Customer Communications: All messages sent to or from the Customer related to this Dialogue are displayed.
- Internal Comments: All internal comments related to this Dialogue are displayed.
- Log: All activity related to this Dialogue is displayed.
How Do I Change The Topic A Dialogue Is Assigned To?
To change the Topic of a Dialogue, simply click on the dropdown menu in the Topic field and select the correct Topic. You can also select “Show More” to see an overview list of Topics alphabetized within the account. Keep in mind that if you reassign a Dialogue to a Topic you don’t belong to, you may no longer have access to this Dialogue.

